I’ve been writing blogs on Journey of A Games Artist, which is now Journal From the Road, since 2010. I was writing before then too on Deviant Art, and I may have had this blog running back in ’09, it’s hard to tell. Writing has always been a form of comfort for me. It has been a way to share my thoughts and feelings with the world in a way that allowed me to inform followers and family about my life while also helping me work out my own troubles in a cathartic fashion . My blogs sites (at one point I had a second site called Power of Two), have been where I worked out the various challenges of living life, professionally and occasionally personally. I know for a fact, A FACT, that I would not be who I am today without my blogs.
Today, I am making the difficult choice to write my last post on Journal From The Road. There are a number of reasons why I’m closing the blog down, and when taken together they form a compelling argument that I can’t ignore. It’s time to say goodbye.
Let’s break some of this down.
First, I simply am not consistent enough with writing blog articles anymore. In the beginning, that was fine. I was a young twenty four year old who would write three or four articles in a month, sit out for a few months, and swing back around and repeat the process. Depending on the period in my life, the blog was a place to share some thoughts or discuss a personal art project. When I started freelancing, I saw it as a way to increase my visibility, if only a little bit. I had no idea that it would be directly responsible for getting me started with Gametextures as a writer. Finally, when I started working at Dreamline, it became a live travel journal of sorts. Today, it feels like an obligation. Between teaching, personal art, keeping fit, taking care of a puppy and the other day to day elements of life, it’s an after thought that I’ve continually shrugged off or blatantly forgotten about. That’s why this farewell has taken until July 1st to materialize.
The tone of the blog has shifted significantly twice; once when I was laid off from WB Turbine, and again when I started at Dreamline. When I left WB, my writing started to become fully formed. I was going on 27, and as a man, I was starting to grow into a truly self-actualized person. Before, my writing was very haphazard and almost care-free. It didn’t have a real point of view except to talk about unemployment from time to time. After I was laid off, it became a place of actual substantial thought, even if it took time to evolve.
When I started at Dreamline in mid 2018, the first post or two wasn’t too different. My final Quarterly Report (I very much enjoyed writing those) was a bit of a downer but it was impossible for it NOT to be. After I got into the swing of the commute, my writing would yo-yo between “I’m ok, here’s some works in progress or some stories” and “fuck this”. Some of those “fuck this” blogs I ended up not publishing, but even in most of my other articles little bits of “I want more time, give me more time” and overall exhaustion kept coming up. 2019 was a great year, but the first 8 months were stressful and it showed in my writing, even the up beat articles.
To combat my tonal issues at the time, I moved a lot of my writing to a ‘Morning Pages’ routine that I learned about from Mandy Stadmiller. In short, you write off of the top of your head and don’t stop. It’s an exercise that exists to clear out the cobwebs and work though problems though a distinct lack of structure. It was a godsend, and I’ve continuing to use it to this day. Surprisingly, because of this routine, I haven’t really had much blog content, which I think is an important signal that I don’t have as much to say. When I started at Drexel, my morning page routine tailed off (but does pick up from time to time) but my normal blogging didn’t pick up.
This year, Covid hit and my Spring Quarter turned into a race to the finish. Writing for anyone but GameTextures took a back seat. Almost everything did.
This brings me to Today.
I have a summer of many planned exercises, writing included. However, Journal From the Road will not be one of them. I expect I’ll continue to post random articles from time to time, either though Medium or through Artstation, but Journal From The Road will sunset, both from a content perspective and as a website. I use Artstation for everything professionally now short of email, and I do not need the added pressure of maintaining multiple websites. I’m not doing a long commute now, and while I could post about the work I’m doing, that isn’t what drives me. I’m driven internally by a desire to continue to grow as an artist, developer, and educator. As I try to squeeze more and more out of every single day (I don’t even have kids yet), I am looking for places to scale back from. This blog is one of the easy-hard cuts to make.
If you’ve been a reader, thank you for that. If this is your first time, most of my blogs have been ported to Artstation so you can check that out (they my disappear when my server shuts down, we’ll see). I will continue to write, you can always find me writing about games and development over on the GameTextures Blog, and I will still occasionally write articles covering many topics from time to time. But today, after something like 10 years, Journey of A Games Artist comes to an end.
Looking in the Rear View Mirror at my Big Moments of the Decade
I have gone back and forth with ideas for this recap blog as the decade comes to a close. Welp, I think I found something I like! Special thanks to the Vlog Brothers for their Decade Recaps, they focused on a few big moments of the past 10 years and I felt like that’s the direction I needed.
In this post, instead of the outline format I had previously or some sort of 2 hour long podcast, I’m going to share the 5 biggest moments that occurred in my life from the start of 2010 to the start of 2020. Simple, fairly light on exposition, and to the point it is. These are in no real order and some of these moments aren’t happy, but they are important to who I am as the new year and decade begin. Happy New Year AND Decade everyone!
#1: Going on the first date with my Wife (May 2013)
In 2013 I messaged my wife on OKCupid. She had fairly mysterious pictures and only a little information on the profile, that was enough to intrigue me. After a week or so of messages, we met up at John Harvard’s in Natick for beer, bread, and outstanding conversation.
While my wedding day was phenomenal earlier this year, that first date and the instant chemistry and connection we shared has influenced so much of my life from then on that it’s relevance to where my life is today cannot be overstated.
#2: Being Hired on Contract by Sony Bend (September 2010)
It had been a year and a half since I graduated college. I had no job prospects of any kind in an area that was ravaged by the Great Recession and my girlfriend at the time and I had many fights over my lack of work. By the start of 2010 I was a man with a plan, and if that plan had failed my life would be vastly different.
I spent the first half of 2010 working on an Game focused Environment Artist portfolio and when August came around, I applied to what was probably nearly 80 game jobs. The process was grueling and defeating at most times, but in the end, a small studio in Bend Oregon gave me a chance with an art test. I did just enough (I assume) to be offered a contract. The sense of relief and hope I felt was almost indescribable. Once I left Indiana for Oregon, I started the process of truly becoming me.
#3: Moving to Philadelphia (May 2015)
My wife (then girlfriend of 2 years) got a job in Delaware in 2015. We were living together in Brookline at the time and she asked me to come with her. I was a bit torn, as I loved being in the Boston area and was doing well enough as a freelancer with my minimal expenses. However, I loved Kelsey and wanted to be with her, and I did figure that Philly would put me closer to New York City, an area with more potential for career/business growth than Boston had at the time. I decided to go with her.
Once all of the moving in and settling was done, some rough patches started to appear. I suffered a few freelance failures and overestimated what I could comfortably afford. Those issues compounded my struggle with adjusting to a new city. This led to financial stress, which led to fights, which eventually led to a big fight. This was a stressful time for both of us individually and as a couple.
All of the above difficulties eventually led me to reach out to Drexel University to look for some sort of teaching work. They immediately hired me as an adjunct and I ended up doing well as an instructor. The increased stability immediately led to improvements in my relationship, finances, and my freelance work. Most of the good that occurred from 2016 on can be traced back to my first application to Drexel.
#4: Going Full Time Freelance (March 2014)
I had been working some degree of freelance leading up to March of 2014, but when I returned from GDC that year, I saw the future and knew that I could capitalize on it. Game Development was coming to the masses and tools were cheaper than ever to use, so I invested in a badly needed new PC and software and did everything I could think of to tell the world “I’m who you need for your project.”
Because of my freelance business and past AAA experience, I was able to work with and meet many people, some of whom I am friends with today. I loved working remotely for myself and as a hired gun, and I was generally good at it. Freelancing led me to many different projects, industries, and even locations.
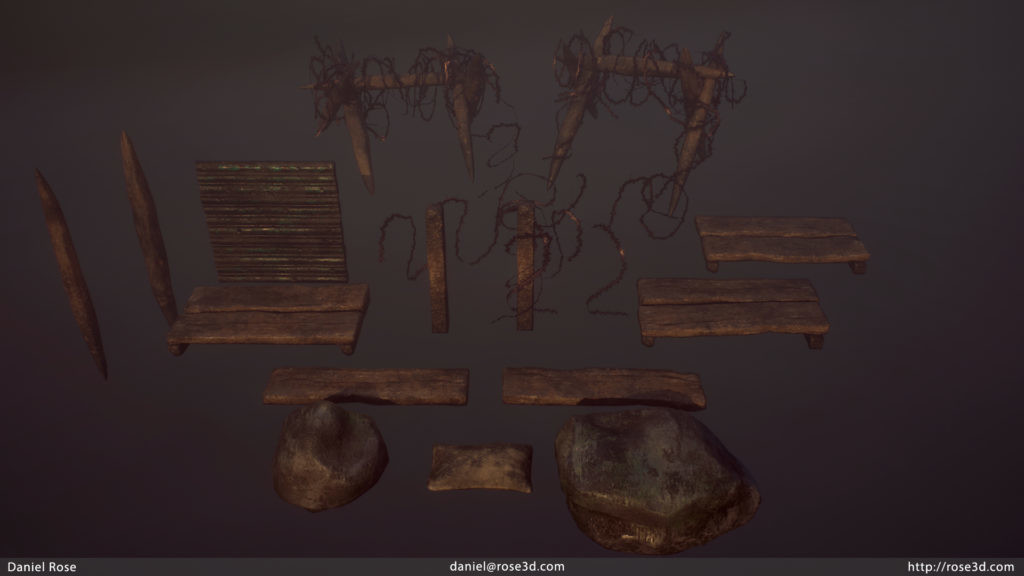
#5: Shadowcore (January-September 2018)
If you’re into a long, heavy read of what the Shadowcore experience was go here. It’s not happy so if you’re in a good mood, I’d skip it for now. The short version is that much of the front half of 2018 was hell (and frankly most of the year was rough).
Facing professional uncertainty as this experience wore on, I started looking for something more stable. Unfortunately Drexel wasn’t able to be the answer at the time, but I did find something faster than expected. It was in an unlikely place; Warminster Pennsylvania at a shower door company.
Dreamline had it’s issues, but I learned a lot while I worked there and I had a generally good experience at work. I made a lot of new friends who I still see every few weeks, and worked under a boss who I got along with quite well. I also had what I had never really had before; stable work, 401k options, and great insurance that I didn’t have to pay for. Seriously, the one thing Dreamline got 100% right was it’s insurance.
Shadowcore and the experience tied to it pushed me in new and uncomfortable ways. It forced me to grow as a person though confronting my failures while trying new professional avenues. While I’m at a positive place today, the pain I went though to get here is something I sincerely hope to avoid for the rest of my life.
Much like the past year, this post has gone though numerous, unplanned changes. From being a simple decade in review to being a +3500 word behemoth, back to a more traditional year in review, I’ve found it difficult to decide how I wanted to recap 2019. It’s been a year of continued monumental and incremental change, almost always for the better. I’ve worked to navigate wedding planning, lengthy commuting, career shifting, honeymooning, and doggie play time.
How can you not love that puppy face!
All of these changes and commitments at varying times has left me with the feeling of missing time and wanting to know where it went. Is this what getting older is all about?
The Good
I want to give a special shutout to my trusty Predator Helios 300, and to Kelsey for reminding me that I can actually buy things from time to time. Without purchasing this machine at the end of 2018, I would likely have not gotten the Drexel position, written anything at all for anyone, or created 3D work on the train (finished or not). Best ROI I’ve had on a purchase to date.
Morning Pages
When I re-branded the blog and hoped to add smaller bits of content last year, it didn’t take long for me to see that some of the first waves of content were stress induced. Commuting, processing the shift to a more corporate job, attempting to art on the train (and not doing the best at it), figuring out how to have a balanced approach to life, getting over the Shadowcore experience…there was a lot I was working though. By the start of 2019 I had managed to settle into a groove with the commute and Dreamline. Despite that groove, I still found I was stressed often. I found a way to work though many of these stressors by writing Morning Pages. Morning Pages is a concept I gleaned from a long series of tweets from writer Manday Stadtmiller. The idea behind morning pages is to write first thing in the morning. This writing is all stream of consciousness; random bits, curse words, and literal gibberish is fair game. The idea is to kick off the dust of your brain and get you primed for the day. For Mandy, it helped her deal with relationship issues. For me, it was the restlessness and occasional unhappiness I felt with my commute and career.
The blog has been sparse mostly because of my morning pages, and that is likely a good thing. If my blog housed all of my brain dump, the negativity, personal issues, and kernels of good ideas would have been aired out in the open without any real vetting. I wrote some weird stuff too, including but not limited to:
A short story of myself on my commute, more or less.
I like Power Cleans. Then it became depressing.
A short quip about being tired. Then I slept.
Notes about the Pros and Cons of Drexel vs a Production Job I did a phone interview for.
MGTOW (Men Going Their Own Way as it is known deep on the internet). This specific page actually had a lot of content as I looked it over.
Politics.
Blender!
Not really related to my train rides until August when they released Fear Innoculum, but I saw Tool in November. Absolutely loved the show.
My brain often needed kicking in the mornings. If you get up at 4:30 AM and don’t need coffee, you are an alien.
I haven’t kept up the habit with my new routine, but while I was at Dreamline this habit was essential. Writing became the main creative outlet for me in the front half of 2019, when I didn’t sleep on the train of course.
My last morning page was recorded at 7/15/19. Hoping to get back to something like it in 2020.
Marriage
Kelsey and I got married on May 4th, 2019. It’s the day the internet knows as ‘May the 4th be With You’ day, and I (and Kelsey) know for damn sure I’ll never forget our Anniversary now. Kelsey isn’t a Star Wars person, but I am. Han and Leia (IGNORE THE SEQUELS) made an appearance. They were promptly eaten by Summer, our dog. The wedding itself was everything we wanted it to be; a big party with dancing and fun and friends. From what I know, everyone had a good time and that’s all I could ask for.
My beautiful wife and I.
As for being married? I’m quite enjoying it. It felt a bit different at first but after I got used to the ring on my finger and the idea that legally, our lives are 100% entwined now, I’ve settled into a good spot. Not much has really changed, and what we’re doing works for us.
My family also had a second wedding this year; the older of my sisters (I’m the oldest) married her long time boyfriend, also a Dan. He’s tall and we look nothing alike so it’s only only odd when we’re both in the same room and someone asks for Dan. He’s a good dude and I’m happy he’s part of the family. Her wedding was also quite fun with a few unique twists and one sloppy drunk. In some ways it felt like being at a resort with a time travel feature. Fun secret? If you want to be internet free and able to do whatever the hell you want, check out north central Wisconsin. It’s a time machine back to a mix of the 90’s and 50’s.
The new gig
The last major change for the better this year was my new job.
I covered most of my job change information and thoughts in my Summer Update. Presently I’m wrapping my first quarter as a full-time faculty at Drexel University. I have enjoyed being back! Being full time has a large number of perks and having that mindset (of being a full time faculty) has also meant that I’m more engaged with my co-workers and the University as a whole. It’s been far more fulfilling and rewarding than I had anticipated.
The Bad
Where has my time gone!
It very much feels like only yesterday I had all the time in the world to do everything I wanted to. Work, gym, art, games, TV with Kelsey…all I had to do was maybe sleep a little less from time to time and I was set. Sure, my own work often took a back seat to freelance contracts, but that was fine! I could squeeze it in here and there most mornings.
Today? Ho Boy.
Even after my commute was cut in half (or more), I’ve been finding it difficult to re-claim time for my personal work projects. I like making assets and selling them. I love playing around in Unreal Engine. This work feeds into my educational content for Drexel. It’s important for all of my career plans. I need to find the time to consistently do it.
So why can’t I? Life I guess maybe?
I plan to really address this issue over the break. I did a short audit of my time a few weeks ago and found that I spend my time about how I thought I did during a typical work day (typical work days include gym visits). The short summary? Compared to a few years ago, I spend an hour a day with my dog playing ball or taking her to the park (yes, she legitimately needs a ton of activity). I also seem to be shortening my work hours a bit as well as expanding my evening leisure time. I think some of this is warranted (spending time with my wife) and some of it is needed (I know I’ve had a bit of burnout lately), but it can’t become a trend as 2020 starts. Since I’m off for the rest of the year and Indiana moves at a snail’s pace compared to city life, I’m going to take some of my vacation time to dig into making a new schedule (complete with updated workouts) for the start of the new year.
Personal Art Output
This really goes hand in hand with my previous time management issues, but it’s also a bit deeper.
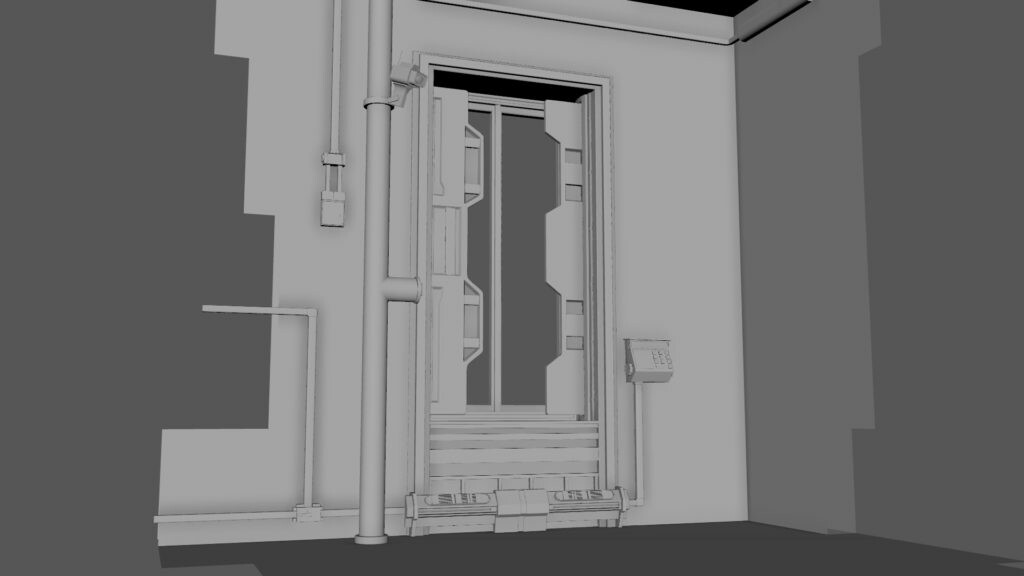
Blade Runner Window Diorama. This is as far as it’s gotten.
In January, I started a new project inspired by Blade Runner 2049 and a meditative ASMR type of sound I found on YouTube. I burnt out on it a few months into the project. I couldn’t sustain it while I was juggling writing, wedding planning, and needing sleep.
I didn’t really write on this blog much due to the aforementioned Morning Pages as well as being incredibly busy.
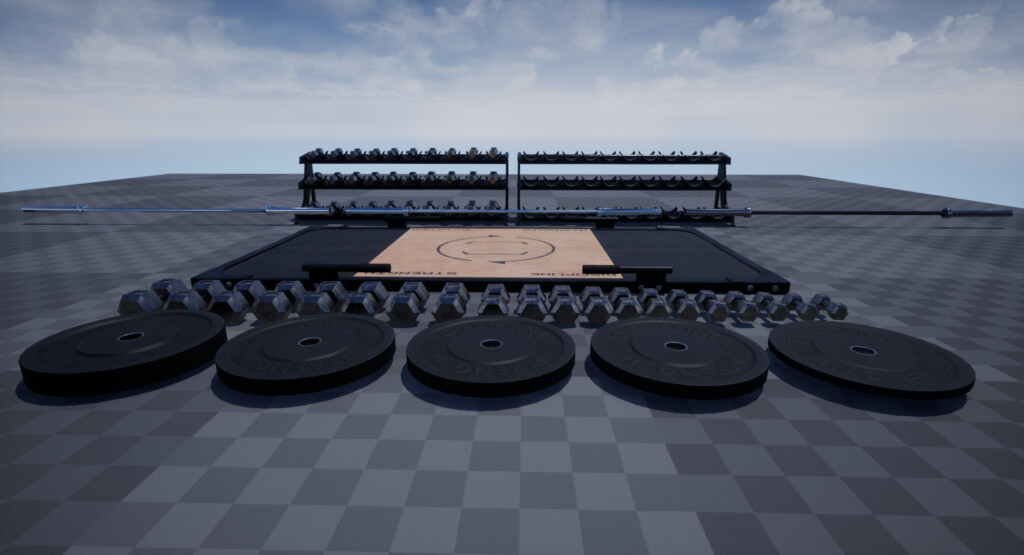
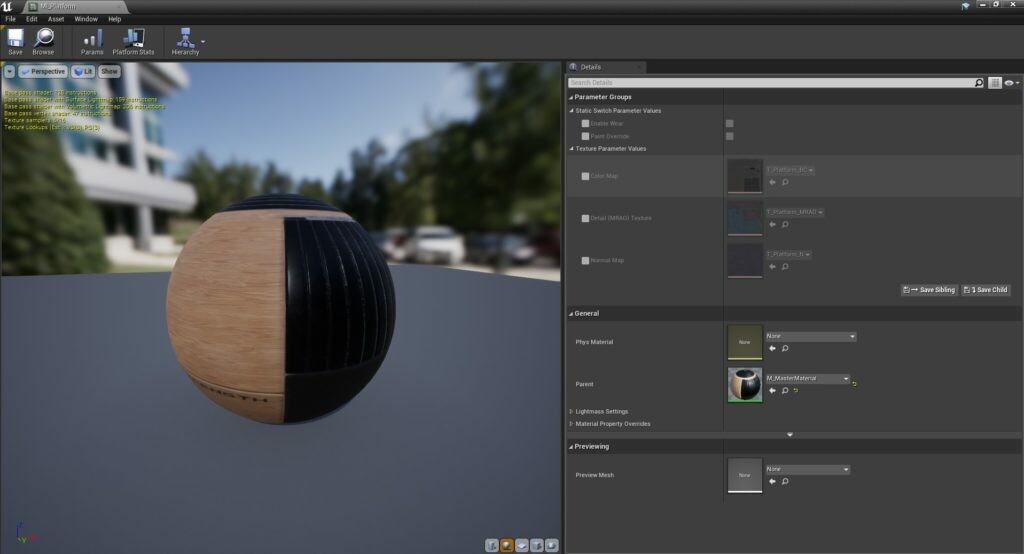
The only 3D art project I did start to finish were my Blender 2.8 crash courses. It ended with The Platform, which itself is a springboard to my Weight Room Assets, but it’s been slow going since that was wrapped.
The Platform, my current showcase for my Blender 2.8 transition. All my my new weight room pack assets are also being made in Blender.
My Asset Pack plans have all slowed to a crawl. Art takes a while and I have not been consistent with anything that isn’t related to Drexel-which is good because teaching is my job. It’s also BAD because my ability to teach effectively relies on my own work as well.
I need to make more art, I need to make better art, and I need to make that art into experiences inside of my favorite tools (namely, Unreal). This has not happened on a consistent basis.
My Future Self and Me…2020 Goals
Going into 2020, I have a few defined goals but no solid plan on how to approach and complete them.
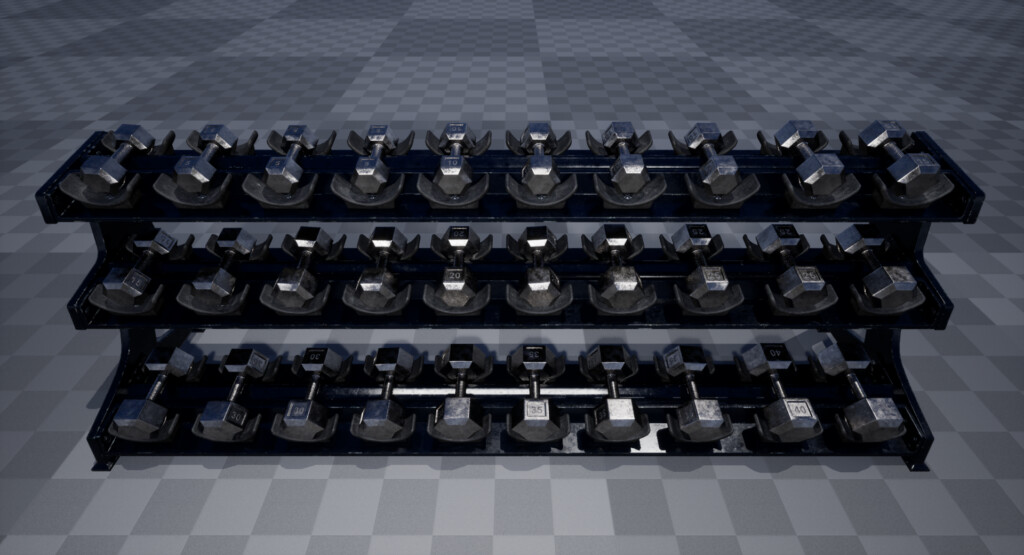
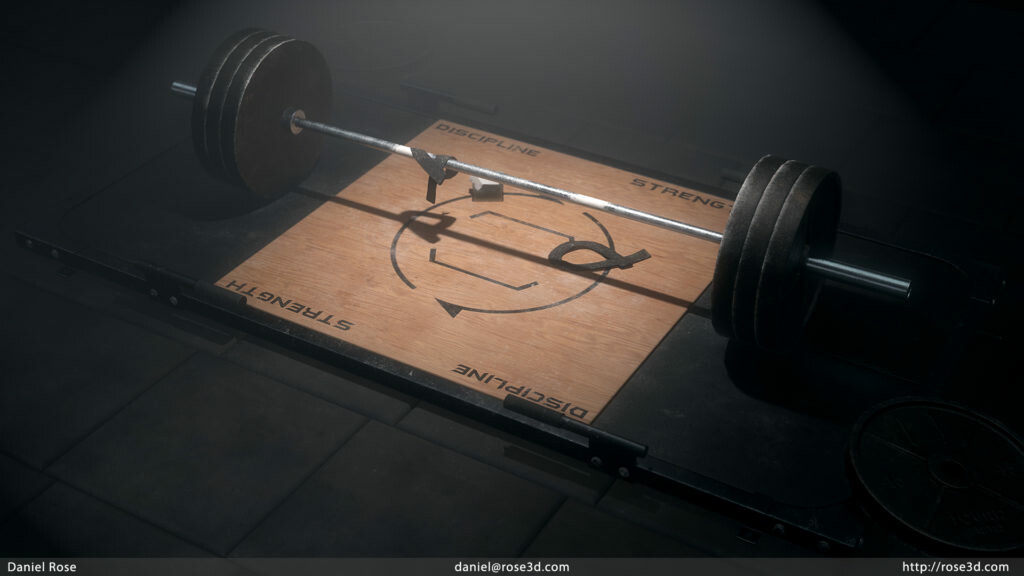
Current iteration of the Weight Room Pack
Current iteration of the Weight Room Test Scene
Platform and Plates
Most assets have materials that allow users to specify how dirty, chalky, or rusted they are
Blueprint Asset for easy placement
It also allows for color and dirtiness level changes.
Continue to perform as a Professor at Drexel
Finish the Weight Room Kit
Start a new, larger scale environment (that hopefully nets a usable kit of some kind)
Pick up my writing here more
Keep my GameTextures articles coming
Game a bit more
Work out a bit smarter
What’s Next
That’s a huge list, and I think the most important point that comes from that list is this: Time Management will be the central theme of 2020. I have the time, now I need to be smart with it.
The last point is especially important. Since starting at Drexel, I’ve spoken to a few professors about ‘what’s next’ as it were. Unless my reviews are trash or Westphal gets it’s funding slashed, I hope to remain at Drexel for a while. Teaching is great, but I want to remain active in the industry too, creating games and experiences in some sort of capacity. I’m still working out how that’s going to look and thankfully, I don’t need to be in a rush. Maybe I’ll be content to work summer contracts or take small freelance roles throughout the year.
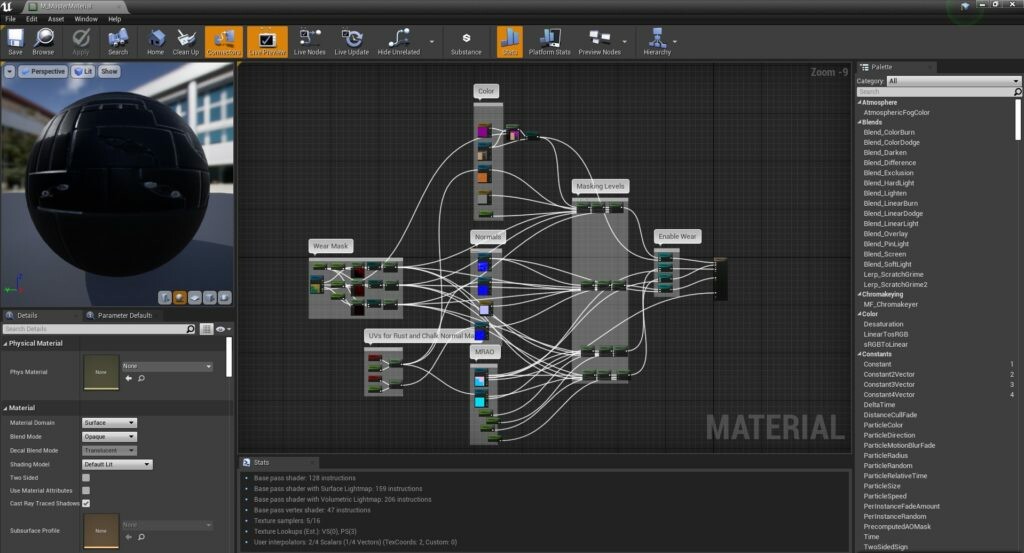
Weight Room Pack’s Material Setup
Clean, simple material
It’s dirtied up
This is the network making it happen
Perhaps I’ll be looking to do something bigger.
Overall, when I think about how 2019 turned out, it couldn’t have gone much better. Now it’s time to make 2020 mine.
Over the course of the last few months, I have taken to learning Blender 2.8. It hasn’t really been chronicled on Journal From The Road too much. In fact, not much has. It’s been a busy summer. As summer turned to fall and school started up, I’ve traded one type of busy for another, far more fulfilling type of busy.
My asset pack is coming along mind you but much slower than anticipated. I blame the sweet combination of puppy, work, and a strong desire to play some games. GAMES ARE AWESOME! I kind of had forgotten how awesome mainlining a game could be.
Go play Control…what was I saying? Oh yea, Blender.
A Marmoset Toolbag render of my personal work titles “The Platform”. Modeled in Blender 2.8
I did a series of articles over on Medium for my friends at GameTextures detailing my experience with Blender and my transition over to it. A few of the GT team use Blender as their main modeling program and with all of the attention 2.8 has gotten (rightly so) it was a perfect series of articles for them. If you’re interested in that experience as well as a Post Mortem for “The Platform” then you’re going to want to check it out. I have all of the relevant links below.
There’s a lot of things on my mind right now that would make interesting content here at Journal, and it’s not just about my hope to freelance for clients again in 2020. I’m kicking around a few different things related to career and life stages, the difference in mindset from 23 to 33 (I’ll be 33 in November), my urge to live a bit more of a minimalist lifestyle in some respects, and why Fantasy Football makes me want to die this year. For the time being, I’m going to focus on my asset kit and students, but in the quiet moments I have while I’m on campus, I may just pop open my laptop and start writing.
When I opted to re-brand my ‘Journey of A Game Artist’ blog to Journal From the Road following my career shift last year, I fully expected to write articles every few weeks. I thought that it’d be a good use of my time on the train and that it’d keep me motivated to work on projects. As the year went on, it became clear that the act of balancing 3D work, GameTextures blogs, and personal writing, would be difficult to maintain during my train rides. Do I work on 3D or write? Do I write for my blog or for GameTextures? Do I do nothing and take naps?
(I absolutely take numerous naps.)
I started a morning pages routine that I really enjoyed in early 2019. It kept this blog a little less ‘bitchy’ for lack of a better term, and a bit more focused. It also let me sort out a lot of thoughts I had during a rather trying time where commute frustrations ran high. I managed to keep writing for GameTextures too, although my output has definitely wavered a bit due to my incredibly busy year.
As it turns out, even having a laptop on my commutes wasn’t enough to make the commute to DreamLine tolerable for a long time. Yes, if I was less dedicated to fitness or wanting to create for myself I think the commute would be less of a pain, but my drive to work on my own projects and become a better artist and writer is too strong to just stop and be complacent.
And, if I’m honest, I think the reason I nap a lot on the train these days is because I push myself physically in the wee hours of the morning.
DreamLine itself is a company on the upswing, I think. I can’t speak sales numbers, but in my short time here I’ve seen a small to mid sized company go though growing pains. The founders and original CEO left the day to day operations earlier this year. They and the board hired a new CEO with lots of experience at different companies in the kitchen and bath sector. I also happen to find him rather personable. The company hired a true HR director as well as a new CFO within the last few months and new processes are being implemented company wide. It’ll take time for some of the unfavorable policies to be adjusted (I hope the company will re-work their sick time and work from home policies) but overall, I believe my coworkers will be at a better version of DreamLine a year from now.
I will not be. I found myself a new full time job.
I am happy to announce that I have accepted a full time faculty position at Drexel University as an Assistant Teaching Professor of Digital Media. I will be teaching a mix of classes ranging from 3D modeling to game development and more. My official start date is September 1st, but since that’s Labor Day Weekend, I will be stepping on to campus as a Full Time Professor on September 3rd. My last day at DreamLine will be August 30th.
Along with the new position comes an additional announcement that I will be returning to the Freelance/Self Employed world as well.
I’m back!
Drexel
Detailing how I managed to land this job without a Master’s Degree might be an article on it’s own. The short version is pretty easy to lay out though; My adjunct instructor reviews were great overall (and only got better the longer I taught) and I got along well with the different program directors I had met with in that time. I was told the Digital Media department had openings partly by chance as I had been in touch with one of the department heads about teaching a night class weeks earlier. I had decided not to teach those night classes, as my schedule would have been horrific. What followed was one phone interview in the freezing winds of winter, a series of interviews in a suit (first time since 2014), and a little bit of luck.
Teaching isn’t what I thought I’d be doing when I was 22. I fully expected to be an Art Director or something by this point. When you’re as green as I was at that time, it can be hard to really know where your strengths lie, and life is just getting started too. I’ve known for a little while now that I deal with people very well and would likely make a pretty good manager or director, but the road to getting there would be long and require too much sacrifice at this point in my life. I would also need a lot of people in their 40’s and 50’s retire early and that’s a bit unlikely. Teaching university students gave me a lot of that fulfillment as an adjunct, and it came with the not so small bonus of sharing with students the mistakes I’ve made so that they can learn from them. That was just as important to me as it was for them to know how to make a prop in Maya.
I now have the opportunity to share my knowledge and experience with them again on a full time basis.
I’m also rather excited to be working closer with the faculty at the University. It’s an easy and non-controversial statement for me to say that I will probably be the dumbest full timer there. During my interview, professors like Paul Difenbach, Tony Rowe, and others really showed me their love for what they’re doing. A lot of them have already accomplished so much and are orders of magnitude more intelligent than I. Many of them chose to teach as well. It very much goes against that old sentiment of “those than can, do. Those that can’t, teach”. Trust me when I say that the men I talked to during my interview process choose this to be the work they do.
Teaching at Drexel also gives me a fair amount of freedom in how I spend my time. I will be on campus more than I was when I was an adjunct, but compared to the time crunch I experience now, my life will feel more open. I have a 4 day work week, with no strict amount of hours set. Some days I may be on campus for 4 hours, for others I may be there for 10. Between my two machines (desktop at home and a laptop on the go) I’ll be able to work anywhere I choose.
More time, more money, surrounded by extremely intelligent peers, and helping to shape the minds of tomorrow; what’s not to like?
I also have, for now anyway, summers to work contracts, learn, or relax.
Freelancing in 2020
One of the many changes I am making.
What does a driven artist do with an extra 12 to 20 hours a week? Besides sleeping an extra 30 to 60 minutes a day and working in a bit more game time, he returns to his roots with a new perspective and a new plan; Self Employment 2.0.
With Self Employment 2.0, I will be giving my business a makeover. I personally believe that my longer term goals and plans will benefit from my new approach. I’ve often wanted to build something from my humble office and have not had the time (nor funds) to do so. Now I’ll have a cool mix of both.
One of the biggest failings I felt I had as a freelancer was my need to always have work. I did not start freelancing with a big cushion of savings that allowed me to be picky in the work I took on. I had to hustle, and I made it work for as long as I could until that feast or famine mentality finally turned on me (there’s a specific VR Project that I worked on in 2018 that ended very badly. More to come soon.) Additionally, because of my need to always have paid work I never felt that I could fully devote myself to improving the quality of my portfolio or, in more recent years, build my own assets. With the mix of stability and flexibility that teaching full time will provide, I believe I’m going to be able to finally do what I really want to.
I have some assets available on Sketchfab and The Unreal Marketplace now, and it’s a great feeling when I see a sale.
Leading into September, I am going to fully rebuild my desktop PC (according to the news, my timing couldn’t be better). It’s been long in the tooth for the last two years and it’s time I modernize. My current PC was built in early 2014 and even with some mild overclocking, it’s showing its age. It can still game at 1080P well enough, but when the Material Editor in Unreal takes moments to think when moving nodes around, it’s time. I have a few gaps to fill in the build (I’m back and forth on GPU’s right now) but overall the build will be anchored by the following parts:
AMD Ryzen 3900x, a 12 core beast of a CPU
AMD X570 Motherboard with PCIE 4.0
512 GB SSD by Samsung, chosen for it’s incredible speed
1TB SSD that is run in a standard SATA config for my work and games
2TB Mechanical Drive for Archival and Media (Music/Movies)
Nvidia RTX something or other. I want the fastest I can get without totally breaking the bank
32 GB of DDR4 3600 RAM
This machine should be able to chew through pretty much any workload I’ll be doing for the next 5 years and will have upgrade paths for at least some of that time.
Once September hits, I’ll be working on asset packs for the rest of the year. I want to have one pack done a month, but if it takes a bit longer to get them done that’s fine. Quality is what is important. These kits will serve a triple purpose; to make some passive income, boost my portfolio, and to increase my visibility. These packs, along with my continued writing for GameTextures, will drive me into 2020 with some degree of momentum. Once 2020 starts I’ll re-evaluate my goals since I’ll have an idea of the additional demands of full time teaching as well as a feeling of what I’m enjoying or disliking the most about this iteration of my self-employment. Since my focus at the end of the year will be on selling assets, I will likely form an LLC and re-organize my products and services under that banner. There is some legal protection that comes with forming an LLC that I want to have.
Plus, how cool is it to be a professor who owns his own company.
What’s old is New Again.Mostly.
In this ‘what’s old is new again’ start to the fall, there are a few differences in how I’ll be approaching my work. In a ‘second go around’ like this adjustments are warranted. I want everything about this set of opportunities to be better than it was before.
Teaching is my #1 priority. It’s my full time, main job and I have a duty to the students to give them my all. I always have, even while working as an adjunct.
I’m excited to be able to give more of myself to my writings (both for GameTextures and my own works).
I’m beyond pumped to start my freelancer rebirth, all beginning with a focus on kits and social engagement.
I’m truly excited for the fall to begin. In some ways I’m looking forward to this more than I was looking forward to moving to Austin to work at Bluepoint in 2017.
I haven’t kept up with this blog as much as I planned when starting at DreamLine. It’s turned out that 2 hours a day on a train isn’t exactly enough time to do everything one would like. Alright, to be fair, that is a somewhat misleading sentiment. I’m sure if I ran my life a little differently, those two hours would be a bit more consistent.
I just like working out too much.
I had a previous draft of this blog, but it was over long and almost a rant on commuting and aspects of life I can be frustrated with. While my commute is frustrating and the physical exhaustion I’ve felt with it lately is getting to me, I decided to rework that article and turn it into something that resembles a constructive, informative, and positive. Negativity begets more negativity and I’d like to avoid that as much as I can. There are plenty of people who’d trade places with me in a heartbeat. I should work on exercising more gratitude.
It’s ok to indulge the urge to share the negative at times, and I definitely do, but I don’t what to be putting that energy out into the ether too often.
Where’s the Art
This is mostly the Low Poly, but the window shutters are the high Poly. The low is almost done, just needs a few more touches and UVs. Maya Hardware 2.0.
I’ve made progress, but it’s been slower than anticipated. A lot of what you see was completed in a two week span. With the Substance Pipeline I worked on at DreamLine being ready for testing and our production at a lul, I used my downtime at the office to work on this project and keep up some High Poly to Low Poly workflow practice. I’m at a point in the project where it’s almost time to start baking everything down to the big map I’m going to use in Painter. Sure, some of the smaller props aren’t made yet and the walls and floors need textures for me to continue modeling, but I can tackle all of that when it comes online..
This was scheduled to be wrapped by the end of April. I am fairly sure
I will not be able to pull that off. Why? Big things.
Life Events
There are two events happening in the next 40 days that will require a
fair amount of my time. The first is my wedding. I’ll be getting married on May
4th to my lovely bride, Kelsey. We’ve been handling the planning on
our own. It’s not going to be some sort of crazy $50K wedding (neither of us
want to spend that much and we’re simple people when it comes to stuff like
this) but even without all the pomp and circumstance of an expensive, over the
top gala, it’s still a lot of work!
I must give Jeff, the event coordinator at our venue, a ton of credit.
He’s making this as easy as it could be for us.
Even so, there is a lot to button up between now and our date. I don’t
think it’ll take up the majority of my train rides, but I’m sure I’ll spend
some time and phone data on it.
Event number two is something I can’t really comment on. For the time
being, all I can say is that it’s going to require a lot of preparation. I’ve
not done anything quite like this before and to make up for that, I need to be
very prepared.
This event will absolutely eat up some, if not most of, my train time
for the next few weeks.
Once everything is wrapped up, it’ll be time to crank Rain out and then take a long break. I
feel burnt already and I want to spend some time relaxing on my rides instead of
feeling pressure to produce. I still want to learn Blender 2.8 and do more work
but I need to take some time to chill out, play some games, and watch TV.
Other Notes
I’ve been back to writing articles for GameTextures over on Medium. It’s been great to be back at that side hustle and do my best to provide what education I can while doing something I love. My latest article was on Resident Evil 2 Remakeand I think everyone should check it out.
GDC was last week. I’ve been trying to absorb what I can from afar. It
very much looks like Ray Tracing is the future of game graphics, although I think
we’re a few years out from wide adoption. I have been approved at work to get
an RTX card once a few PC setups are taken care of. Unreal 4.22 will have RTX
support and I will be looking at how it can enhance our real time work. That
will be very fun.
Unity 2019 looks cool. Every time I see some of their stuff I want to jump back in. Same with CryEngine/Lumberyard.
That’s it for now. I hope to
be back with more posts a bit more regularly after I’m married ?
I haven’t been able to write as much as I wanted to so far this year. This is going to be a very fast update on how things are progressing and why I’ve been a bit slow with content.
It’ll be presented in my ‘infamous outline format’
2019 has started off with a bit of burnout. I’m working on an art piece but the pace has been slow due to general mental (and often physical) exhaustion.
I have been meditating more this year, and it’s been good for my overall well being.
I’ve been spending more time writing and editing for the GameTextures blog. It’s good to be back doing paid features, on a far more regular schedule too.
Between Wedding Planning, writing and editing for GT, and my schedule for my job, I’ve been very slow with my journal entries and my personal art. It’s very frustrating if I focus on it.
But, I can’t focus on it too much. I’m straddling a fine line between self care, self improvement, and professional work. I’m going to squeeze in what I can-when I can.
That’s it for now. A short update on what’s happening. I hope to have more to share in the future when things settle down a bit.
Generally speaking, my pre-production blogs on personal projects are posted early on in my process. I like to outline projects in writing first and share the plan with the world. I find that it helps me organize my thoughts and is some fun content for my readers.
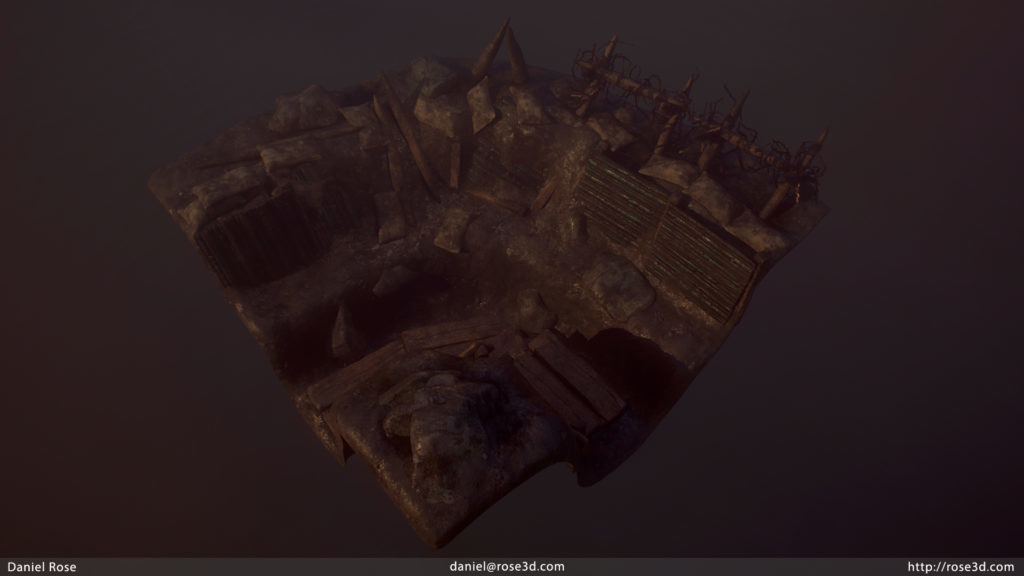
I’ve been working on Rain for a few weeks now and it’s been…a struggle. The technical content of the piece isn’t the issue too much, modeling is going fine for now and I know what base materials I need to create. No, my main issues are one of time, energy and really just fucking hating my commute some days of the week (my ride home on 1/16 is one example).
First things first; my initial project outline.
Rain: A Diorama
Pre-Production Outline
Project Summary
A small diorama of a window and its immediate surroundings as depicted by my concept drawing.
Source inspiration is from Blade Runner and similar styles-Cyberpunk and Retro Futuristic concepts, movies, and games.
Story: An old, retrofitted building holds this window that looks out into the rain. Noir elements, like whiskey, coffee, books, and other references to a tortured detective adorn the window sil. Small references to source material can be found in the deco throughout the room. Everything is old, lower class, and failing while it is made to be functional.
Project Goals
Art on the train!
Learn Blender by tackling a small, simpler scene
Focus on high quality, realistic materials hand created in Substance Designer
Compose the entire scene using a single 4K texture set
Substance Painter for final Texture Composition
Rendered in Marmoset Toolbag and SketchFab
Polycount-everything is a hero asset, so high (but not unrealistic)
What to sell?
Entire Scene
Include all Files, SPP included
Materials Only Pack
Conventions
T_Rain_Suffix.tga
Ex. T_Rain_BC.tga
SM_ModelName
SM_ModelName_HP or LP for any models to be baked in Marmoset
Workflow
Models will be made in Blender
High Poly Models will be made in Blender, exported to Zbrush for damage pass as needed.
Bakes will be 16 bit PNG in Marmoset
Scene will be composed in Blender
Texturing: Full scene with multiple Material Sets will be exported to Painter OR individual models will be exported to Painter. TBD
Some sort of New, yet not hyper shiny, metal for tech-Unknown
Holographic Display-Krita
Plastic for the Wires (Painter)
Brick (Substance)
Asset List
Wall
Floor
Ceiling
Window Sil
Window
Metal Gate Mechanism
Piping
Hanging wires
Cup (Coffee?)
Book (by Philip K Dick)
Pills
Holo Display
Wall Support Structure (beams)
Maybe back wall of Brick/Concrete? Unknown.
Lighting Plan
Won’t know until the models are done, but plan is for feint blue or yellow light to shine from the “inside” of the window. On the “outside”, Neon Pink and Blue will radiate in. IBL will be overcast. VXGI usage will either vary or be not used.
Addendums and Edits
Now that I’m a few weeks into the project, I’ve already made a few changes to the project’s plan. Most of these are made in the interest of both time and ease of working on the train.
Blender is out, save for perhaps some small props
Why: I have started learning Blender at work and I dig parts of it for sure. I’m sure I’ll like it more and more as I use it and the interface in 2.8 (and usability vs other versions) is leaps and bounds more than what I remember. Unfortunately, Blender is different enough that I’m going to have to spend time making small, simple models before I’m confident enough to rely on it for my primary tool. I’ll keep dabbling while at work, but I’ll save the meat of learning for my summer “experimental period”.
Only Base Materials will be for Sale.
Why: By moving away from Blender for this project, I’m back to Maya. However, in my bid to cut personal costs, I have axed Maya LT. I’m thus using an educational version of Maya 2018. I have no interest in breaking any EULA’s, so I’m going to sit tight and just sell my Substances.
The complexity of the room has increased a bit, but the reliance on new Substances has decreased.
Why: Creative direction. I have a ton of reference and I’m trying to focus on shapes and silhouette of objects. Pipes have pretty boring profiles and aren’t going to give me a more angular look, so I need to find ways to make them interesting. The overall complexity and Substance changes are pretty minor, but I think it’ll be a benefit for the project overall.
How’s it coming?
My blockout is to proper scale and conveys the key parts of my scene, so that’s been a success. In fact, if I build my props to the sizes of the blockout, I’ll basically be able to build the scene out piece by piece and be done much quicker than I usually am.
I often screw up scaling of my parts a little bit each time.
What I am struggling with is building out my actual models. I’m focusing only on one so far-the simplest one in fact (vertical pipe) and I had problems the 16th of January with everything. My tablet wasn’t super responsive, Maya was acting like a fucking asshole, and I felt cramped and trapped in my train seat. I honestly would like to spend some time at work or at home on this but both are busy right now.
Although, I could probably work in a 4 hour block of working on Saturday and Sunday.
That might be necessary. I’m finding that I need, at least for this project as is, a steady block of hours to get into a flow and just build. This is a small project designed to be worked on while I commute, but aspects of the commute and my mental state after work so far (exhausted) are proving to be blockers. As much as I like a rigid schedule, I’m clearly in need of more flexibility.
Plan moving forward
For the time being, I’m going to try-keyword is try-to get in 8 total hours of art on the weekend (4 and 4). I’m also going to try to work on the train in the mornings only. For the time being, my evenings will be a gut call. I tried to force it last night and I got some work done, but after 20 mins or so everything went to shit. If I went by feel, I would be a bit more refreshed as I write this. Maybe I would have even tried to model today.
I’ve given myself plenty of time to get this done. There should be no reason I can’t work in some self care too. I clearly need it.
I will be speaking mostly about my professional experience in 2018.
If you read my Thanksgiving post, then this will sound familiar: Thank you 2018, but fuck off.
2018 has been a very Jekyll and Hyde year for me. It started out slow on the work front, and when it picked up…it was for a client that didn’t work out. The experience I had with that client ended up wrecking the rest of my plans for the year and pushed me to where I am now, doing 3D work at DreamLine Shower. DreamLine has its issues for sure, but I’m salaried, have good benefits, am paid every two weeks, and I get to work with some pretty cool and talented people. The commute sucks and while the laptop has helped significantly, it’s not a silver bullet to cure what is a long morning and evening. There are days when I wake up and feel ready to pull the plug on this full time thing and go back to bed. Then I get up and go to work.
I’ve often said while freelancing that I am my business and my business is me. I may not be actively freelancing as of this writing, but I absolutely believe that is the case for me, for you, and for your mother’s uncle. In 2018, if you aren’t treating your professional work like a business, salaried or not, you’re not doing it right.
I’m going to write this recap much like I did my most recent Post Mortem. I’ll write three or so points of what went well, three of what didn’t go well, and three points of what I’m doing to improve and change for 2019. This will not follow my quarterly report structure as I’m no longer actively freelancing and any income I’ve made from assets or writing is pretty small this year thanks to, well. You know. 2018.
What I did well in 2018
I never gave up.
I tend to think of myself as a tenacious individual. I will bang my head against a wall to make impossible situations work, and in some senses that’s what being a real-time artist in Philadelphia is like right now. With a very small, independent game industry and local architecture firms a little behind the interactive curve, anyone who works in real time technology is either an indie dev hoping to make some cash on the side with freelance programming work (Unity Developers), or Unreal Engine specialists (me) who scrap for remote work.
It took 3 years for this to finally catch up to me, and it’s mostly because I did business with the wrong people. But more on that later.
I fought and clawed to find work earlier in the year, and after that went south, I kept on fighting to make sure I was paid for my work. It took far more effort and stress than I want to exert again and, if I’m honest, the last bit of my payment happened by accident. But I got paid in the end, and I was shown that my writing, my fighting, and my tenacity can still create a deadly combo. That is something I can build on.
Rewiring my body and mind.
As 2018 as gone on, my body and mind have been required to re-wire themselves. I have always been a bit of an evening owl. Left to my own clock, I’d be awake at 9 AM, working out at 4 PM, and in bed around 1AM. My old freelance schedule often was up at 7AM, working out at 3 PM or so, and in bed by midnight (though 1PM wasn’t unheard of). With the end of this run of my freelance career, my schedule has shifted significantly and I’m kind of better for it. My days are long and exhausting, but the shift does leave me feeling ready to take on the day.
I’m up at 4:30 AM to take out the dog and get some water and coffee in me.
Gym a little after 5 AM
Workout for an hour
Get through the rest of the morning and the commute and walk into work a little after 9 AM.
Wrap up work at 6 PM and head home
In bed by 9:30/10 PM
It’s a long day and I do want parts of this modified in the future regardless of what I’m doing, but the early wake up call and the morning workouts are likely here to stay in some fashion. The longer I’ve done them the more I can feel my body adapting to lifting heavy things first thing in the morning. When my career shifts again, a version of this schedule will remain, although I’d prefer a somewhat later wake up time.
Mentally, my mind has become more still and focused. It took a lot of time to come to a place where I’m not running through negative thoughts or cursing my career moves, but now that I’m here I feel like I can move forward. Meditation and some therapy have helped, but the biggest value I’ve gotten thus far has been from my first visit to a Float Tank.
Writing about Floating will be for another time, but I’ve found that I’m often (but not always) able to access the floating feeling in my limbs and in my mind when I lay down for bed. This meditative state has let me get incredibly restful sleep the past few weeks and clears my mind of negativity and most other running thoughts. It’s not perfect, but being able to call that up as well as my general meditation has really helped with my mental health as the year comes to a close.
I arted on the train.
My commutes the second half of the year were pretty rough. Between running around to catch a train 10 minutes earlier than I needed to and losing all productive time I had during the day, I was miserable. I love games, but I love creating more.
Purchasing my laptop and using it to create on my rides has been a godsend. I’m ‘generally’ creatively fulfilled and able to work without interruption (no one can bug me while I art now) and my rides are something I actively look forward to. Where do you think I’m writing this?
Is it perfect? No. If you read my Trench Post Mortem you can see some of the issues I’m presented with as I work. But I’m happy to make the most of my time these days, and I really enjoy my laptop. So work away I shall.
What I did Poorly in 2018
Ran my freelance business like a dumbass..1, 2 AND 3
I stopped freelancing and teaching in the summer of this year. I chose to do so because I went into business with with someone who ran their business in an incredibly shitty way (due to pressures on them and lack of experience). I’ll repost this experience in the future, although when I can’t say.
It wouldn’t have happened however, if I didn’t make short sighted plans. When I got back from Bluepoint, I lost sight and grasp of what made me successful as a freelancer-being cautious about the work I picked up and grinding to make ends meet. That sounds rough, but freelance can be a grind and I was grinding from 2013-2017. I needed to get back to that mindset for 2018, but I couldn’t. At least not until I ran aground.
With the lack of a hungry, grinding mindset melding with the traditional financial worries one has (I have a huge tax bill and other bills!) I looked for work of any kind and any set of dollar signs I could. Turns out it’s something I shouldn’t have done.
Other than getting into business with a client who I shouldn’t have, I didn’t prioritize the asset stores that are becoming ever more popular. Sketchfab’s store is nice and easy to use, ArtStation lets you sell basically anything, and Unreal and Unity have huge user bases. I got some assets up (and just launched my Trench Kit on ArtStation and Sketchfab) but they were never focuses for me. I honestly think that was a failing of mine. With intelligent planning and focus, I could have done much better on the marketplaces than I have.
For those interested, Epic’s Marketplace has been the best to me thus far sale wise.
Let’s see, what else is there.
GDC had a poor return on investment. If any. I didn’t know how to pitch myself because I had just finished working on Shadow, yet wasn’t looking for on-site work due to the wedding I have coming up. Plus, you know, I had just been out of state. That led to confusion when talking with others on both their part and my part. That’s a bad look.
I burned through cash from April to June while looking for work. It was mostly on my credit card but it’s always time to pay the piper and I ended up needing to do that in addition to my holiday shopping recently. It wasn’t TOO bad but I do always prefer to save if I can.
All of this, in some sort of sense, led me to Dreamline.
Looking forward to 2019
Cost Cutting: The Move to ‘mostly’ Open Software
Part of what I want 2019 to be is the year I make some moves to keep my future costs down. I’ve always been interested in learning a new modeling package like Modo, but when you rely on something to put food on the table, it’s difficult to justify taking time away from using the tool you know to learn a new one. You will gain that skill, but you also might not eat for the month or two you spend learning it.
I don’t have that worry with DreamLine right now.
I’ve already started to make this change, but in 2019 it will come full circle. I have chosen to end my Maya LT subscription and to pick up Blender. With 2.8 planned for a production ready release early next year and with 2.79b being in great shape, it’s time I make the jump and learn something new.
This change was honestly prompted by my desire to save $260+ a year.
In the same vein, I’m NOT going to get an Adobe subscription to update my Photoshop. I’ve been using an old (and legal!) CS 6 version of Photoshop at home. For my line of work, it gets the job done. Yes, Adobe has added a LOT of useful features since CS 6…but for the work I do, $10/mo is a bit much for an image editor.
Krita is a free (donations accepted) image editing and digital painting software. If I need to make a quick texture, I can do it in Krita. Post production? Easy as pie. Touch ups? Doable too! Krita has all the tools I need to handle the type of work I do. It’s not as good as Photoshop and if I was doing serious design work I’d pay for the Adobe Programs, but for a 3D artist who’s made the move to Substance, Krita will more than suffice.
These moves should set me up for longer term sustainability moving forward. I’m looking to save $399.88 a year (plus taxes) with these moves, and I will be looking to make more in the future (do I need to pay for my domain and hosting when I can get it through ArtStation?) DreamLine won’t be forever and my personal life will dictate when/if I return to freelance or some other form of 3D self employment, and finding ways to cut costs without a dip in quality will be important when that time comes. I’m in a position where I can think about this now and have the time to adjust to the moves I’m making. Plus, I’m legitimately excited to learn some new tricks.
My planned software arsenal in 2019 will look like the following:
Blender
Zbrush
Krita
Substance Designer
Substance Painter
Unreal/Unity for game projects
Marmoset for Art Showcases
Small Art Projects, Small Game Prototypes
Now that I’ve spent time working on the train, I have a better grasp of how I can continue to art while I commute. Small projects and studies are the way to go here. It’ll make asset kits hard to create unless it’s a focus, and I think small dioramas (smaller than I’ve done) and studies are the best way for me to grow my skills right now. I can still sell them if I choose.
So if I have small drips of store content for the next year, that’s ok.
I have broken up the year into 3 main projects:
Cyberpunk Diorama that is currently in early pre-production. Jan-Apr
Studies and props. May-Aug
“Bleeding Me” diorama, somewhat inspired but not based on Metallica’s song of the same name. Sep-Dec.
The schedule may change, but the idea won’t. I have 4 months slated for each set of projects and the projects themselves are small. Studies are freeform, so I don’t have pressure to pick anything. I can do what appeals to me at the time.
It’ll be a lot considering I’ll be learning Blender, but it can’t be hard to make a window in a new program (plus I can always use the Educational Maya if I’m not going to sell anything).
Outside of art, I have a few game prototypes kicking around in my head. If I feel like I want to start pushing those, I’ll need to find the time. I’m not sure the train will work for that (I need internet for help), but if it’s important to me, history shows I’ll find a way.
Thanks for taking the time to read and bear with me this year. I hope you enjoy the New Year and I’ll see you in 2019.
My original draft of this Post-Mortem was a mess. I was tired, the train was loud, and I had just finished doing some tweaks for a GameTextures Gift Guide that I hope will make it out by the end of the week. Needless to say, this post-mortem was awful.
Today, as I start my new draft, I’m rested and ready to rock. I have mixed feelings about this project for sure, I feel that I didn’t completely hit the quality bar I wanted to when I set out to create my trenches, but now that I’m a bit more rested and relaxed, I can see the forest and the trees. The most important thing about this project is that I got it done and learned what I can manage on my commute.
Let’s get into it.
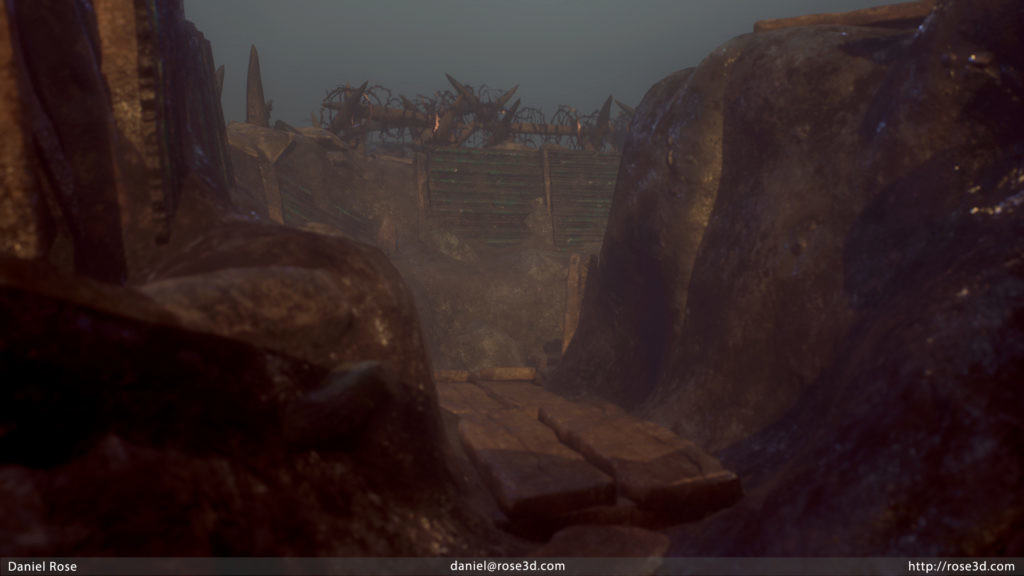
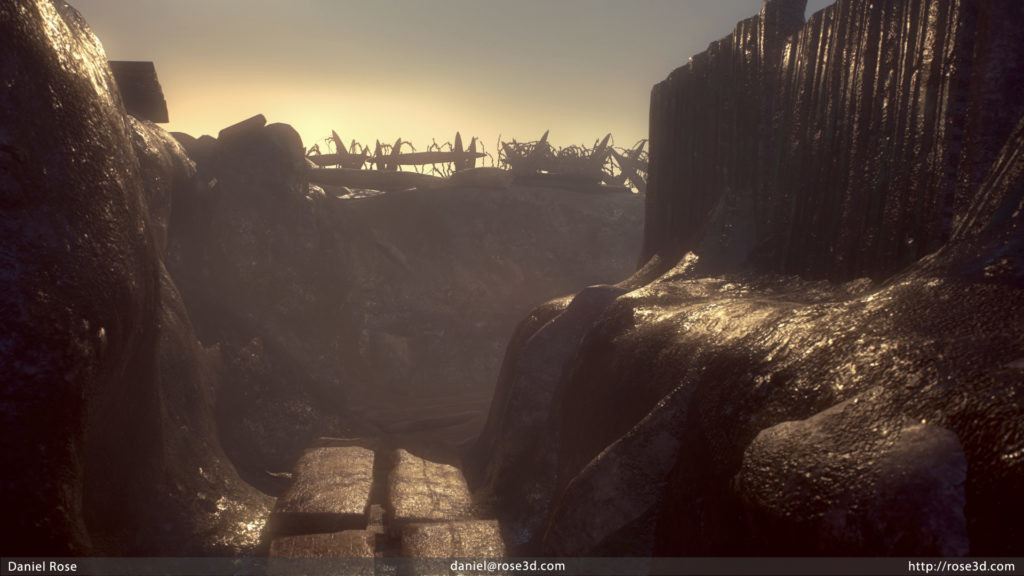
Project Overview: Trench Kit
This project was based on a class assignment I gave my students at Drexel University during the Spring Quarter of 2018. I wanted them to be challenged by something out of left field and I didn’t want to keep shoving variations on a still life down their throats. So, I created this assignment.
It was a huge hit
After I finished the critique and grading period, I wanted to do a version of The Trench as well. My goal was to turn this into a kit of parts that could be sold on Sketchfab. With all of the different storefronts that exist, I wanted to keep a narrow focus and selected Sketchfab to be my storefront of choice, mostly due to expected time constraints related to starting my current job. I took the blockout I did for my students, added to it, and began work on my trench kit.
By the end of the project, I had created 5 FBX ‘prefabs’ that I could ‘jam’ together in an engine. There was a lot that didn’t turn out the way I had intended, but instead of restarting the project like I would have in the past, I pushed through and finished it. This was a start to finish with no re-work project.
I’ve lightly modified my storefront plans due to how the project turned out; I’ll host my models on Artstation and SketchFab with my Substance files (SBSAR and SBS) being made available as well, but the terrain pieces will not be made available as they just don’t work as intended and realistically, wouldn’t be used in most games like this anyway..
This was also the first project I completed using my laptop on my commute. Only a handful of render stills were captured while I was home (still on the laptop). This was a great lesson in working within a limited daily time frame in a less than ideal setting.
This project wasn’t everything I wanted it to be, but it provided a lot of valuable insights into how I need to handle projects moving forward. I learned a few new things along the way too.
What Went Right
Working on my Commute
I bought my laptop specifically to use to work on my commute. The first two months or so after I started work at DreamLine, I spent my commutes trying to write on my old Galaxy Tab 3 or playing my Playstation Vita. While that was all well and good, I couldn’t find time to work on my own projects. My time constraints during the week were too great, and I am basically shut down on the weekends. My weekday starts at 4:30 AM with lifting and ends at 9:30 or 10:00 PM. This is a 16+ hour day, and between my job and my art I probably work 12-13 hours of a given day, so I need the weekends to relax. A laptop was the only way I was going to find time to work on projects during the week.
This has proven to be a huge success. There are challenges involved with trying to make art on a train, but the fact that I am able to is a huge win overall. Clawing back 2 hours a day for me to work has been invaluable to my happiness.
My Substance Workflow
They might not be perfect (ok, they aren’t), but I’m getting the hang of making complex Substances and doing fully featured integrations with Painter. I wanted to make everything myself for this project and I did, with the barbed wire and the corrugated metal being the only exceptions. Having limited time means I needed to work smart and using the Substance Workflow I did was key.
Once I made my Substances in Designer (one of the more time consuming aspects of this project), I moved them over into Substance Painter using the SBSAR format. Thanks to some of the work I have doing at DreamLine, I stated exposing parameters too (although later in the project). With a mix of exposed parameters, an easy re-import process, and a few custom masks made from exported maps, I was able to quickly and easily texture the majority of my assets. This also furthered my goals of using both programs more and has left me feeling more confident in my usage of the core Substance tool kit. I think my overall material work was a high point of this project, even if the individual materials could use improvement. Never underestimate visual consistency.
Alternatives
When I started, I initially set out to use Sketchfab as my main platform of choice for everything. I don’t often connect to the internet on my commute (I like to save cash when I can) and when I do, I don’t like to upload files. So, to check the quality and validity of my work, I would import it to Marmoset Toolbag 3.
Once I started using Toolbag, I didn’t stop. With it’s bevy of rendering features (Who DOESN’T love VXGI) and ease of use, I decided to adopt it as my primary renderer and to only upload a single, chosen trench prefab to SketchFab. I think this turned out great, as my renders from Toolbag look pretty dope all things considered. Sketchfab has some limitations that Toolbag doesn’t, and although using the full set of rendering features on my laptop killed my battery on my commutes, It was well worth it.
My other big “alternative” was my adoption of Krita. I have been a Photoshop user my entire life, but with my Laptop and goals to cut costs personally and professionally, I needed some sort of alternative. When I stopped to think about my workflow, it became pretty clear that having the full set of Photoshop bells and whistles was useless-Substance handles most of my needs there. But for image editing and some resizing, I needed SOMETHING.
Arvin Villapando, one of the early staffers of GameTextures, suggested Krita. He has a love of using early, free, or beta software and he was a big fan of Krita. I decided to use it for this project and I very much enjoyed it (and 4.1.5 has a nice face lift too). It does pretty much everything Photoshop does in regards to my type of art, just in a slightly different way (and for much less money).
What Went Wrong
Land of Terrain Confusion
Generally speaking, this wouldn’t be an issue. In Unreal, Unity, or other game engines where I would have more control over materials, I would build a material that had different blending options I could control, and blend a number of tiling textures. Even if I chose to use kit parts as they are, it would have worked fine.
As far as I know, Sketchfab would not have supported this, and Marmoset was equally limited (at least out of the box). I made the choice to uniquely unwrap my little terrain models and texture them individually in Painter. This would have made them more appealing overall because I could blend between different materials.
It worked…but…it didn’t make for a production ready asset. No one should realistically use my terrain models as is, and even less so with their 4K texture sets. Plus, the models don’t truly snap because I sculpted each terrain mesh in Zbrush. They connect OK, but the mesh separation is pretty obvious and without more blending via models or a Decal set, it just doesn’t look right.
I usually consider terrain work a strength of mine as it was modeled in the fire of hand modeling it for Uncharted: Golden Abyss and Shadow of The Colossus (though to a lesser degree). In this case, it was one of the weaker aspects of my project.
Not Keeping it Small
Compared to the other projects I’ve done, this really was pretty small. That doesn’t mean I handled it properly. Instead of keeping it to a small, single diorama piece, I expanded it to a mini environment with multiple shots. This took away from other work I could have done (more assets to really sell the trench) to make for a stronger, more focused piece. This is an inverse of the trap that many artists fall into, where you have a grand idea that is *hopefully* cut down to a manageable project. I made the opposite mistake and I believe it takes away from what I delivered.
Working on My Commute
While being able to work on my commute is great, there are many aspects of it that caused issues. There isn’t a lot to expand on here so I’m going to present it in an outline format.
A few times during the week I was too exhausted to work.
I lost two…TWO! Intous Pro Pen 2’s.
My tablet has an odd bluetooth issue where tracking gets poor pretty quickly only to be fixed by moving the pen away from the tablet. Apparently this is a Train Only Feature.
An inability to get into and maintain ‘flow’ for more than 30 minutes.
I’m limited to a single 1080P screen, which makes checking reference cumbersome.
When the train goes fast (usually in the evenings) I often have to stop until it slows due to jerkiness.
Zbrush performance is mixed because it won’t switch over to my Nvidia GPU.
I’m often a bit cramped.
Moving forward with the lessons learned
With the project complete, although not quite as I imagined it, I’m left with many lessons to take into my projects in 2019, which will be a pretty big year in terms of changes to my core software choices. But I’ll leave that for my 2018 wrap up.
I need to work on significantly smaller art projects moving forward. While my laptop has proven invaluable to getting work done on the train, the limited time frame and my long days in conjunction with being on a train means that I am prone to burnout, exhaustion, and frustration. Projects with long time horizons, foreseen or not, do not work in that setting.
As long as this commute is the norm, I would expect to see me output more singular props or Substance Material Spheres than fully featured environments or even dioramas. Fully featured asset packs are likely out too, as the time required to properly set them up and make them live on stores is more time I don’t have. I still have to do that for this project but I am burnt toast with a lot more on my plate still.
I need to make SBSAR’s the cornerstone of my workflow. I didn’t properly get into SBSAR’s until towards the end of this project. They will save me a boat load of time AND be infinitely re-usable as I build a personal library of materials. I know that using GameTextures or Substance Share can properly help me make assets faster, but I love building out materials in Designer and having a solid understanding of the tool will make me significantly more employable in the future.
Marmoset 3.05 is here to stay. I love Unreal, but I’ll be using it for other experiments right now since I use it at work. Marmoset does exactly what I need to display my work in a timely manner. I know it’s capable of more than I used it for this time around too and I can’t wait to dig into it a bit more.
Pushing this project through was the right choice. Sometimes game developers push a game out before it’s done. Schedules, time, and money can get in the way of taking that extra time to polish up a project and make it truly perfect. It’s up to the developers to figure out what the best course of action is in those situations. Do you delay and eat the cost at the expense of team morale and potential payments? Do you ship, hoping to update the project enough that it’ll be respectable quickly? Do you say “here it is, we’re done” and move on to something new and better?
I made a bad call with how the terrain was handled, but for once in my personal 3D Artist life I pushed through and just banged the work out. It’s flawed but it severed a bigger purpose to me. It proved that working on the train CAN WORK and I can continue to push my skills to their limits.


